
· Word Template feature
in Dynamics CRM 2016: https://community.dynamics.com/crm/b/crminogic/archive/2016/02/01/word-template-feature-in-dynamics-crm-2016
The Word Template feature is introduced in the MS Dynamics CRM 2016.
It is useful to create templates as well as to present data stored in the CRM model through a document.
3 ways in which a word template can be created:
1. Navigate to Settings -> Templates -> Document Templates -> New -> Select Word Template and entity. This enables you to create a template for the entity which has been selected.
2. Navigate to entity. for e.g. for the entity, Quote. Navigate to Select a record -> click on more option (…) -> Select a Word Template and then click on “Create Word Template”
3. Navigate to entity for e.g., for the entity, Quote. Navigate to open a record -> click on more option (…)-> Select a Word Template and then Click on “Create Word Template”
Here are the steps to create a word template for the entity ‘Product Quotation’.
1. Navigate to entity e.g. If the entity is ‘Quote’. Navigate to select a record -> click on more option (…) -> Click on Word Templates -> Click on Create Word Template
2. Select a Word Template.
3. Select an entity from the drop down list, Filter by entity.

4. Click the Select Entity button to select the corresponding relationship entity.
Multiple relationship entities are selected. Here, the entities, ‘Quote Product’, ‘Account’ and ‘Contact’ are selected.

5. Click on the Download Template button. After the template gets downloaded, open a document in MS office.
When a fresh document is opened, the Developer tab is disabled. So, before moving ahead, enable the Developer tab so that the attributes are included.
Steps for enabling the Developer tab.

Navigate to the Word Template file -> Click Options -> Navigate to Customize Ribbon -> Check Developer Option and then click OK.
6. Click on Developer tab -> Select XML Mapping Plane. The XML Mapping plane appears to the right side of document.
7. Select the link urn:microsoft-crm/document-template/quote/1084/ from XML Mapping drop down list.

The attributes of the selected entities appear in the XML Mapping area.

8. To create template format.
Steps for selecting the attributes for the document
For e.g, for, Effective date right click on the attribute, effectivefrom from XML Mapping -> select the Insert Content Control and then select the Date Picker option.


Do not capital the first letter of logical name of attribute.
Make sure that the first letter of the logical name of the attribute is in the lower case.
If first letter appears to be in upper case, then navigate to File option in Word Template -> select Option -> Select Proofing -> Click AutoCorrect Options.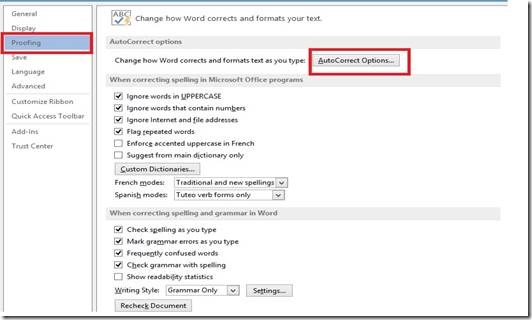

Uncheck the option Capitalize first letter of sentences from Auto Correct tab and click on OK button.

9. Select the customer name then right click customeridname and select Insert Content Control and select the Plain Text option.

10. To display the records of the sub-grid, create a table and insert the attribute from Insert Content Control option.

11. To display all records of sub-grid, first select a row from table then right click relationship entity from XML Mapping and then select the Insert Content Control followed by the Repeating option.

12. Save the document in .docx format.
13. 3 ways which could be used to upload a template:
Navigate to Settings -> Templates -> Document Templates -> UPLOAD TEMPLATE and then Browse the template.
NOTE: While uploading the word template through this step, the document is displayed in Word Templates under the Word Templates option.
Navigate to entity for e.g., for the entity, Quote -> Select a record -> click more options (…) -> Select a Word Template -> Click Create Word Template -> Click the Upload button -> browse the file.
Navigate to entity for e.g., for the entity, Quote -> Open a record -> click more options (…)
-> Select a Word Template -> Click Create Word Template -> Click the Upload button and browse the file.
NOTE: While uploading the document through the 2 ways mentioned above, the document is displayed in the Personal Word Template under the Word Template option.
14. In order to send the quotation to the customer, Select a customer record -> click more option (…) -> Select a Word Template -> Click Uploaded template for downloading the document.
After opening the document, it would appear as per the screenshot mentioned below.

NOTE: The word template feature is for a single record. In case of multiple records, the word template option is not displayed.
· Using Word templates
in Dynamics 365: https://www.microsoft.com/en-us/dynamics/crm-customer-center/using-word-templates-in-dynamics-365.aspx
Using Word templates in Dynamics 365
Dynamics CRM 2016
Updated: November 1, 2016
Applies To: Dynamics 365 (online), Dynamics 365 (on-premises), Dynamics CRM Online, Dynamics CRM 2016
This feature was introduced in CRM Online 2016 Update and CRM 2016 (on-premises).
 Tip
Tip Check out the following video: Create documents directly from Dynamics CRM by using Word and Excel templates (2:38)
 Warning
There is a known issue when creating templates in Word. This topic contains information on how to prevent interactions that could potentially destabilize Word. See: Important! A known issue and how to avoid it
The following are the supported versions of Word.
Area
Word Version
Creating a Word template
2013, 2016
Using a Word document generated in Dynamics 365
2010, 2013, 2016
Follow the steps in this topic to successfully create and use Word templates in Dynamics 365.
Where you can create a template
There are three places in Dynamics 365 where you can create a Word template:
From the Settings page. Go to Settings > Templates > Document Templates > New( ).
).
). You’ll need sufficient permissions to access to the Settings page, such as System Administrator or System Customizer.
From a record. Open a record such as an account in Sales.
Go to Sales > Client_Accounts > My Active Accounts.
Click an account to open it, and then click More (…) > Word Templates > Create Word Template.
Templates created here are personal and available only to the user creating the template.
From a list of records.
For example, go to Sales > Client_Accounts > My Active Accounts.
Select a single account, and then click More(…) > Word Templates > Create Word Template.
 Tip
TipTo delete personal document templates, do the following:
Click Advanced Find ( ).
).
).For Look for, select Personal Document Templates.
Click Results (!).
Select the personal document template to delete and then click Delete ( ).
).
).After clicking Create Word Template, select an entity to filter with, and then click Word Template > Select Entity.

The relationship selection page appears.

This screen requires an understanding of your Dynamics 365 data structure. Your Dynamics 365 administrator or customizer can provide information about entity relationships.
For admin content, see: Create and edit entity relationships.
Here are some example relationships for the Account entity.
Relationship
Description

An account can have multiple contacts.

A lead, account, or contact can have multiple accounts.

An account can have multiple marketing lists.
A marketing list can have multiple accounts.
The relationships you select on this screen determine what entities and fields are available later when you define the Word template. Only select relationships you need to add Dynamics 365 data to the Word template.
 Note
NoteTo ensure documents download in a timely matter, there is an upper limit of 100 for the number of related records returned for each relationship. For example, if you’re exporting a template for an account, and you want to include a list of its contacts, the document will return at most 100 of the account’s contacts.
Download the template
Click Download Template on the Select Entity page to create a Word file on your local computer with the exported entity included as XML data.
Step 2: Enable the Developer tab
Open the Word template file. At this point, the document appears to be blank.

To see and add Dynamics 365 XML data, you need to enable the Word Developer tab.
Go to File > Options > Customize Ribbon, and then enable Developer.

Click OK.
Developer now appears in the Word ribbon.

Important! A known issue and how to avoid it
There’s a known issue with Dynamics 365-generated Word templates and Microsoft Office Word.
In the next section, you’ll be adding XML content control fields to the Word template.
WarningA few things can cause Word to freeze, requiring you to use Task Manager to stop Word:
You insert a content control other than Picture or Plain Text.
You make a textual change, such as changing the capitalization or adding text, to a content control. These changes can occur through AutoCorrect as well as user edits. By default, Microsoft Word AutoCorrect capitalizes sentences. When you add a content control field, Word sees it as a new sentence and will capitalize it when focus shifts away from the field.
To prevent issues with control fields, do the following:
You use the XML Mapping Pane to add Dynamics 365 entity fields to your Word template. Be sure to only add fields as Plain Text or Picture.

You can make formatting changes to content control fields, such as bolding the text, but no other textual changes, including capitalization changes.

If you experience Word freezing or performance degradation, try turning off AutoCorrect.
With the template file open in Word, go to File > Options > Proofing > AutoCorrect Options.

Deselect Capitalize first letter of sentences and Automatically use suggestions from the spelling checker.

Deselect Hyphens (--) with dash (-) on the AutoFormat and AutoFormat as You Type tabs.
Click OK.
If you followed the above recommendations, you’re ready to define the Word template.
Use the XML Mapping Pane to define the Word template with Dynamics 365 entity fields.
In your Word template, click Developer > XML Mapping Pane.

The default XML schema is selected.

Select the Dynamics 365 XML schema. It will begin with “urn:microsoft-crm/document-template/”.

 Important
If you have frequent accidental edits that cause Word to freeze or have performance degradation, be sure to turn off the AutoCorrect options according to the section: “A known issue and how to avoid it”.
Expand the Dynamics 365 entity, right-click the entity field, and then click Insert Content Control > Plain Text.
The Dynamics 365 entity field is added to the Word template.

Add additional entity fields, add descriptive labels and text, and format the document.
A completed template might look like this:

Some content control fields you entered likely have multiple lines of data.
For example, accounts have more than one contact.
To include all the data in your Word template, set the content control field to repeat.
Set content control fields to repeat
Put fields with repeating data in a table row.
Select the entire table row in the template.

In the XML Mapping Pane, right-click the relationship containing the content control fields, and then click Repeating.

When you use the Word template in Dynamics 365 to create a document, the table will populate with multiple rows of data.
When the template has the fields and formatting you want, save it and upload it into Dynamics 365.
Step 4: Upload the Word template back into Dynamics 365
‘When you have your Word template built the way you want, save it so you can upload it into Dynamics 365.
Access to the newly created Word template depends on how you uploaded it and to the access granted to the security role.
Be sure to check out Use Security Roles to control access to templates.
Dynamics 365 administrators can use the Settings page to upload the Word template into Dynamics 365.
A template uploaded in Settings is available to all users in your Dynamics 365 organization.
In Dynamics 365, go to Settings > Templates > Document Templates.
Click Upload Template.
Drag the Word file in the dialog box or browse to the file.

Click Upload.
Non-admin users can upload a template for their own use from a list of records.
In Dynamics 365, open a page with a list of records, for example, the list of customer accounts in Sales.
Select a single item such as an account, click More (…) > Word Templates > Create Word Template.
Click Word Template > Upload.

Drag the Word file in the dialog box or browse to the file.
Click Upload.
To use the Word template you’ve created, do the following:
Open a record with information you want to create a document. For example, open a customer account record in Sales.
Click More (…) > Word Templates, and then under Word Templates select the template you created.
If the template you created is not visible, there are two possibilities:
Only templates built for the selected record type (entity) will be displayed. For example, if you open an opportunity record, you will not see a template you created with the Account entity.
You need to refresh Dynamics 365 to see the template. Either refresh your browser or close and reopen Dynamics 365.
After you select your Word template, Dynamics 365 creates a Word document from the record you selected.
Try out the sample Word templates
There are five Word templates included with Microsoft Dynamics 365.

The sample Word templates were created with a particular record type (entity).
You’ll only be able to apply the template to records of the same record type.
Name
Entity
Opportunity Summary
Opportunity (Sales area)
Campaign Summary
Campaign (Marketing area)
Case Summary
Case (Service area)
Invoice
Invoice (Sales area)
Account Summary
Client_Account (Sales, Service, and Marketing areas)
To apply a sample Word template
- Open a record with information with the entity type that matches the sample template.
For example, open a customer account record in Sales to apply the Account Summary template.
Click More (…) > Word Templates, and then under Word Templates select the sample template.
Open the newly-created Word template and give it a look.
NoteYou can review but not edit templates that are included in Microsoft Dynamics 365.
Additional considerations
Use Security Roles to control access to templates
Dynamics 365 administrators can control access to Word templates with some granularity. For example, you can give salespeople Read but not Write access to a Word template.
In Dynamics 365, click Settings > Security > Security Roles.
Select a role, and then click the Business Management tab.
Select Document Template to set access for templates available to the entire organization.
Select Personal Document Template for templates shared to individual users.
Click the circles to adjust the level of access.

Lists in created documents are not in the same order as records
Lists of records created from a custom template may not appear in the same order in Word documents as the order in Dynamics 365.
Records are listed in the order of the time and date they were created.
· Dynamic Docs vs. CRM
2016 “Word Templates”: https://community.dynamics.com/crm/b/crmsoftwareblog/archive/2016/02/23/dynamics-docs-vs-crm-2016-word-templates
Dynamics Docs vs. CRM 2016 “Word Templates”
About the end of 2015 Microsoft released CRM 2016 with new features allowing CRM users to create Word Templates with merged fields from CRM records.
Earlier this year Dynamics Objects released a similar product, Dynamics Docs, to merge CRM fields in Word Document.
Unlike Documents Templates released for CRM 2016 only, Dynamics Docs comes with advanced features not available in CRM 2016 Word Templates, and Dynamics Docs is also designed for earlier versions of Microsoft CRM (CRM 2011, CRM 2013, CRM 2015 & CRM 2016).
Click here to download Dynamics Docs trial version
Click here to download Dynamics Docs trial version
Note: Dynamics Docs comes with the functionality of 1-click to attach document as PDF file, to an Email or Note.
With Dynamics Docs, the generation of the document and attachment as PDF to an Email, can be triggered with CRM Workflow.
These two functions are not available with CRM 2016 Word Templates, but are available with Dynamics PDF-Docs, another add-on to CRM 2016 to PDF Word Templates or Email them with CRM Workflows.
Click here to download Dynamics PDF-Docs trial version
This post lists important features available with Dynamics Docs when compared with CRM 2016 Word Templates.
Click here to download Dynamics PDF-Docs trial version
This post lists important features available with Dynamics Docs when compared with CRM 2016 Word Templates.
- Dynamics Docs can display records from List View and from the record form including child and related records. If you wish to display records from list view, like listing all unresolved cases, in CRM 2016 you need to use an Excel Template not Word Template of CRM 2016.
- When listing child records, whether the records are selected in list view or from an open record (form view), in Dynamics Docs you can apply a filter which is an entity view. To display the record of a client (Account) and all its unresolved cases, select the “All Unresolved Cases” view, when the template is designed. CRM 2016 Word Template does not have the feature to filter records by view. In the above example, all active and resolved cases will be displayed, for the selected Account.
- With Dynamics Docs, at any stage of designing a template, users can add attributes (fields) from views of related records. In CRM 2016 Word Template, when creating a new document template, you first generate the Word template in CRM by selecting the entity and the related entities to the entity (1:N, N:1, N:N Relationship). If one of these relationships is not included in the template, and you find it at a later stage in your template design, there is no way to add this relationship then. All you can do is start again.
4.Dates and quantity fields need to be formatted in CRM for proper display in the document. Most documents require Date only (not Date & time) and only 2 decimal places, and not 5 as some fields in CRM.
5.With Dynamics Docs you can perform the following:
- Insert today’s date.
Insert maths calculations like sum, average and count.
Insert logical operation. A good example is when you wish to create a statement like document and insert fields with negative values in one column of a table and positive values in another, like invoices in the Debit column and payments in the Credit column.
Download Dynamics PDF-Docs Trial Version here by Dynamics Objects
Related posts:
- Free Download of CRM 2016 Documents Templates (Word Templates)
Dynamics PDF-Docs for CRM 2016 Word Templates
The First Add-On to Dynamics CRM 2016 Document Generation – PDF Docs !
· CRM 2016 “Word
Templates” > Email as PDF Attachment with Workflow: https://www.crmsoftwareblog.com/2016/02/crm-2016-word-templates-email-pdf-attachment-workflow/
CRM 2016 “Word Templates” > Email as PDF Attachment with Workflow
With Dynamics PDF-Docs CRM add on (download trial – click here) users can create a CRM Workflow to PDF CRM 2016 Word Template as an attachment to an Email.
The Workflow has 3 steps:
Step 1: Create email and enter the From, To, Subject and body of Email.
Step 1: Create email and enter the From, To, Subject and body of Email.


Step 2: there is a new workflow step available in CRM 2016 called “Perform Action”. Select Entity as None (Global). In set properties select the Template to be used while the Target field is the Entity for the selected template.

Step 3: select Dynamics PDF>Add Word Template. In this view select again the Word Template. Select if the attachment is Word or PDF file, and using the lookup field, point to the Email created in step 1 above.

Note: This workflow example is included in Dynamics PDF-Docs solution and can be downloaded here.
WWW.DynamicsObjects.comby Dynamics Objects
· {Tips &
Tricks}-Show repeating content in Dynamics CRM 2016 word templates: https://community.dynamics.com/crm/b/debajitcrm/archive/2016/01/07/tips-amp-tricks-show-repeating-content-in-dynamics-crm-2016-word-templates
Word Templates
I am not going to document here regarding the word template generation feature of Microsoft Dynamics CRM 2016.
My personal favorite – http://crm.fueledbysleep.com/no-code/the-new-features-of-dynamics-crm-2016-how-to-use-them/#comment-3336 which explains both how you can use the word and excel templates to your advantage.
Here I am going to explain how to generate repeating content, for example – show all the emails related to an account.
First I download a template for the account entity. How to do it, you can find from the above post.
First I download a template for the account entity. How to do it, you can find from the above post.
As I am interested only in the emails, I have just included that relationship.

Now I insert a table. I wanted to include From address, to address and the subject of the email. So I create a table with the appropriate headers. I select a 3×2 table as I need an empty row after my header.

Now I select each of the three cells in the empty row of the above table and then insert appropriate fields.
Another important point to note here is, if you want to display the From and To fields of the email, do not select the from and to. Instead select the fields – sender and torecipients.
Otherwise the fields won’t display anything.

Now comes the important part. Select the entire row (all the cells of the row) using the cursor (do not select the table or the row from the table border)
Once the entire row is select, right click the relationship and then select Repeating as shown in the screenshot below.

It would look like something as below once you are done with the whole process.
The biggest mistake people do here is select the entire table or select the entire row from the border of the table.
If you do that, the table won’t be visible at all.

Save and upload the document template. To do this, please refer to the link I provided.

Save and upload the document template. To do this, please refer to the link I provided.
Now once you view the template in the context of the account record, you can see all the emails.

